Popcorn ceilings, which were once a popular trend in home design, have fallen out of favor due to their outdated appearance and potential health risks. Removing popcorn ceilings is a great project for modernizing your home. This guide will walk you through the process step-by-step, ensuring you achieve a smooth, updated ceiling.
Why Remove Popcorn Ceilings?
Aesthetic Improvement: Popcorn ceilings can make a room look dated. Removing them instantly modernizes your home.
Health Concerns: Popcorn ceilings installed before the 1980s may contain asbestos, a harmful substance. Testing and removal can improve indoor air quality.
Maintenance: Popcorn ceilings are difficult to clean and repair. A smooth ceiling is easier to maintain and repaint.
Preparing for the Job
Step 1: Test for Asbestos
If your home was built before the mid-1980s, it’s crucial to test the ceiling for asbestos before starting. Asbestos test kits are available at home improvement stores, or you can hire a professional.
Step 2: Gather Tools and Materials
You’ll need the following tools and materials:
- Ladders or scaffolding
- Plastic sheeting and painter’s tape
- Protective eyewear, masks, and gloves
- Scraper or putty knife
- Spray bottle filled with water
- Drywall compound and sandpaper
- Primer and paint
Step 3: Prepare the Room
- Clear the Space: Remove all furniture and cover the floors with plastic sheeting. Secure the sheeting with painter’s tape.
- Turn Off Power: For safety, turn off the power to any ceiling fixtures and remove them.
- Ventilate the Room: Open windows and doors for ventilation during removal process.
Removing the Popcorn Ceiling
Step 4: Soften the Texture
Fill a spray bottle with water and lightly mist a small section of the ceiling. Allow the water to soak in for 10-15 minutes. This will help loosen the texture, making it easier to scrape off.
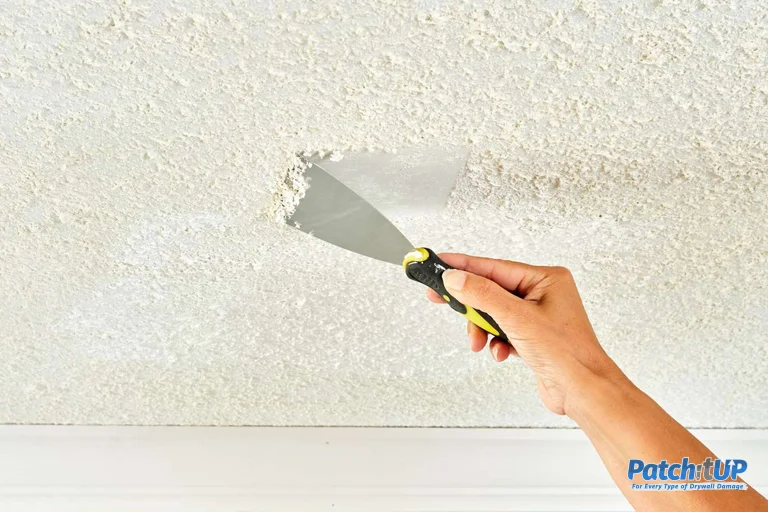
Step 5: Scrape the Ceiling
Using a wide scraper or putty knife, gently scrape the softened popcorn texture off the ceiling. Work in small sections to avoid damaging the drywall underneath. If the texture is stubborn, mist it again with water and wait a few more minutes before scraping.
Repairing and Finishing the Ceiling
Step 6: Patch and Sand
After the texture is removed, inspect the ceiling for any damage. Use drywall compound to fill in any holes or imperfections. Once the compound is dry, sand the ceiling smooth with fine-grit sandpaper.
Step 7: Prime and Paint
After priming the ceiling to seal it and get it ready for painting, apply your chosen paint color. Typically, two coats of paint are needed for a smooth, even look.
Tips and Tricks

Work in Sections: Tackle the ceiling in manageable sections to ensure thorough removal and to prevent the water from drying out before you can scrape.
Stay Safe: Always wear protective gear, including a mask and goggles, to avoid inhaling dust and debris.
Be Patient: Removing popcorn ceilings can be a time-consuming process. Take your time to avoid damaging the drywall and to achieve the best results.
Consider Professional Help: If your ceiling contains asbestos or the job feels too daunting, consider hiring a professional. They have the tools and expertise to safely and efficiently remove popcorn ceilings.
Final Thoughts
Removing popcorn ceilings is a rewarding DIY project that can drastically update the look of your home. By following these steps, you can achieve a smooth, modern ceiling that enhances the overall aesthetic of your space.
Remember to take safety precautions seriously, especially when dealing with potential asbestos. With the proper preparation and patience, you can transform your ceilings and enjoy a clean look.
FAQ’s
Q. Why should I remove my popcorn ceiling?
A. Popcorn ceilings can collect dust and be difficult to clean. Removing them can update the look of your home and improve air quality.
Q. Can I remove a popcorn ceiling myself?
A. With the right tools and preparation, you can remove it yourself. However, it can be messy and time-consuming.
Q. What tools do I need to remove a popcorn ceiling?
A. You’ll need plastic sheets, a spray bottle with water, a ceiling texture scraper, a ladder, safety things like goggles, and a dust mask.
Q. How do I prepare the room before removing the popcorn ceiling?
A. Remove the furniture or cover them with plastic sheets. Seal off the room with plastic to prevent dust from spreading to other areas of your home.
Q. What should I do after removing the popcorn ceiling?
A. After scraping off the texture, you’ll need to repair any imperfections with joint compound, sand the surface smooth, and apply a new coat of paint.
Leave a Reply